Nutanix AHV supports advance virtual network Layer L2 and management network layer L3 functionality with IP Address Management ( IPAM ) feature to provide the dynamic IP Address to Guest VMs running on Nutanix platform through enabling the built-in Nutanix Acropolis DHCP server.
Nutanix Administrator can enable the Nutanix virtual network un-managed network L2 and/or management network layer L3 Nutanix Acropolis DHCP Server through single click.
Nutanix Virtual Networks – Layer 2
Each VM network interface is bound to a virtual network. Each virtual network is bound to a single VLAN; trunking VLANs to a virtual network is not supported. Networks are designated by the L2 type VLAN and the VLAN number.
For example, a network bound to VLAN ID – 189 would be named “VLAN 189”.
Each virtual network maps to virtual switch br0. The user is responsible for ensuring that the specified virtual switch exists on all hosts, and that the physical switch ports for the virtual switch uplinks are properly configured to receive VLAN tagged traffic.
A VM NIC must be associated with a virtual network. It is not possible to change this association. To connect a VM to a different virtual network, it is necessary to create a new NIC. While a virtual network is in use by a VM, it cannot be modified or deleted.
Tag VLAN On Virtual Network
You need to tag VLAN on virtual network to transmit the VMs traffic. Here the steps to tag the VLAN on virutal network thorough Nutanix Prism.
Step 1: Login to Nutanix Prism
Step 2: Go settings > Network Configuration > Create Network

To create virtual network just need to provide the following information as shown below:
Name : Provide the identical name to the network so you can identify the network i.e DB Server VLAN, VMs VLAN, Production VLAN, DMZ Network etc.
VLAN ID : If you are using default physical switch VLAN ( known as VLAN 1 ) or flat network switch then you enter the VLAN ID 0 ( zero ). Or if you must custom VLAN i.e 10, 20, 30, 40, 100, 200 etc. enter the same VLAN ID configured on physical network switch.
Read also: Nutanix AHV: VLAN Tagging on Guest VM
Nutanix Managed Networks – Layer 3
Nutanix virtual management network L3 support IP Address Management – IPAM feature for advance networking features and in-built dynamic address assignment Nutanix Acropolis DHCP server.
A virtual network can have an IPv4 configuration is a managed network Layer3; one without an IPv4 configuration is an unmanaged network. A VLAN can have at most one managed network defined. If a virtual network is managed, every NIC must be assigned an IPv4 address at creation time.
A managed network can optionally have one or more non-overlapping DHCP pools. Each pool must be entirely contained within the network’s managed subnet.
If the managed network L3 has a Nutanix Acropolis DHCP IP address pool, the NIC automatically gets assigned an IPv4 address from one of the pools at creation time, provided at least one address is available. Addresses in the DHCP pool are not reserved.
That is, you can manually specify an address belonging to the pool when creating a virtual adapter. If the network has no DHCP pool, you must specify the IPv4 address manually.
All DHCP traffic on the network is rerouted to an internal Nutanix Acropolis DHCP server, which allocates IPv4 addresses. DHCP traffic on the virtual network (that is, between the guest VMs and the Controller VM) does not reach the physical network, and vice versa.
A network must be configured as managed or unmanaged when it is created. It is not possible to convert one to the other.
Read also: Nutanix AHV: Enable VLAN Trunk Mode on Guest VM
Configure Nutanix Management Network L3
To configure the Nutanix Management network Layer 3 – IP Address Management feature with DHCP functionality then you need to follow following steps:
Step 1: Login to Nutanix Prism Web Console
Step 2: Go to Setting > Network Configuration > Create Network as shown below > click to IP Adress Management (IPAM ) option
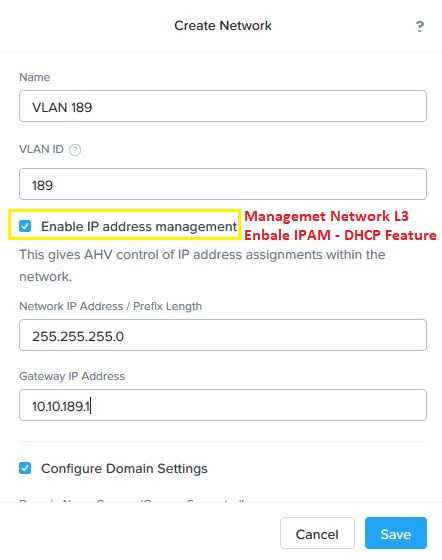
Step 3: Configure DHCP IP Address Pool to enable the Nutanix Acropolis DHCP Server details

Just click on ” Create Pool ” to enable the Nutanix Acropolis DHCP Server to assign IP Address to running VMs on Nutanix HCI platform only.
Step 4: Hit save.
Note: Nutanix Acropolis DHCP server doesn’t assign dynamic IP address to outside the Nutanix cluster.
Now enjoy the Nutanix Acropolis networking features.
Thanks to being with HyperHCI Tech Blog to stay tuned with latest and trending technology.!
Useful Links
- What is Nutanix Webhook Explained
- Nutanix AHV Supported Guest OS List
- Shutdown / Start Nutanix vSphere Cluster – Best Practice
- P2V / V2V Migration Prerequisites For Windows / Linux – Best practice

I’m Manish Kumar, founder of HyperHCI.com and a senior IT consultant with 13+ years of experience in infrastructure design and cybersecurity. An official certified SME for ISC2 and Nutanix, Also, certified in CISSP, CompTIA Security+, VMware and AWS. My expertise covers HCI, virtualization, cloud computing, network and security across Nutanix, VMware, and AWS platforms Read more


